印前检查清单:设计师如何准备你的印刷设计文件
时间:2023-07-13 09:42
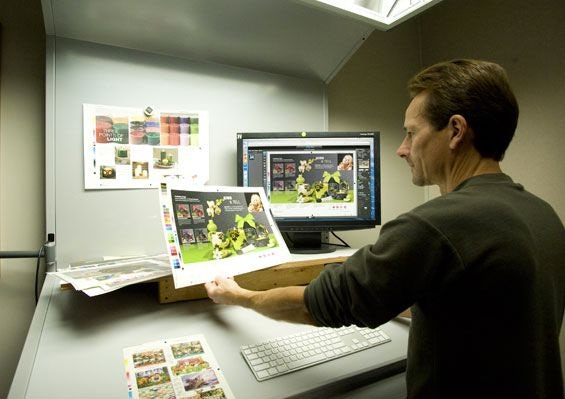
设计完美的宣传册、海报或名片的最佳方式是设计师和他们的客户一起工作。双方都应该参与到项目的每一步,从创意产生到印刷。不幸的是,他们中的一方或双方常常认为印前和印刷应该由印刷厂或印刷店的技术人员专门处理。
这是一个错误!
让没有设计背景的人修改文件的危险在于,这可能会导致不必要的设计修改,从而破坏预期布局的整体效果。如果您想确保在桌面和打印店之间的翻译过程中不会丢失任何东西,对您的设计文件进行一步一步的印前检查可以节省您的时间和一系列令人头疼的问题。它也能为你省下一大笔钱!
您的分步印前清单:
校对一切
检查字体间距
确认图像尺寸和分辨率
确保颜色准确性
校准您的屏幕
定义出血和裁剪标记
注意拼版
创建高分辨率PDF
选择完美的纸张
一个设计项目预算的25-75%应该预留给印刷费用。如果在印前没有发现错误,那么修复生产线的成本会高得多。
一旦您知道要寻找哪些元素,准备印刷的图形设计文件就会变得快速而简单。为了让您在印刷时占据上风,我们整理了一份印前检查清单,涵盖了您在完成校样时需要查找的所有内容。它包含了从简单编辑到高级技术程序的所有内容。当然,设计师和客户都应该参与进来。以下是我们的印前清单,可以帮助您开始:
1. 证明自由校对一切
—
小疏忽,如打字错误和语法错误,可能是完成销售和客户选择竞争的区别。A来自站立狗互动的投票我发现只有3%的人不介意错误,然而大多数人认为错别字和语法错误是决定是否继续阅读的一个因素。
“负面的网络用户体验会损害销售,”他们写道,“这次抽样调查的结果表明,打字错误和语法错误可能会导致一家公司的大部分潜在客户对其网站产生负面体验。”
打印时,捕捉错误更为重要。一旦你的设计到了消费者手中,就没有办法实时更新了。
在将文件发送给出版社之前,您需要进行两种类型的校对。语言校对涵盖了大多数人与编辑相关的内容:检查语法错误、打字错误、拼写和广告中使用的语言的整体流程。
印前校对(或图形校对)从图形的角度触及文本的视觉吸引力。在换行符的末尾寻找分裂的单词,行本身的长度,甚至文本间距。最需要注意的是在断句时保持一致的行长度。如果没有适当的间距,更长或更短的行会很突出,会破坏文本块的整体一致性。

2.检查字体间距
—

完成校对后,就该设置文本间距了。大多数字体和设计程序都进行了某种程度的优化,但是不使用自己的视觉判断来调整字体往往会让它们看起来有点差。
经典的排版程序,如调整主要的, 跟踪和字距调整文字的中心是创造独特的外观,让你的设计脱颖而出。把你的整个图像想象成一幅作品:每一个标点符号、字母、空格和段落都必须与其他部分紧密结合,为你的设计的浏览者创造一个无缝的体验。
3.确认图像尺寸和分辨率
—
打印前仔细检查图像的分辨率。这意味着不仅要注意设计中照片的分辨率,还要注意保存整个最终草稿的分辨率。
打印项目应保存在300 DPI或更高,但莎拉·杜安,高兴地斑点男孩写道“一个好的经验法则是总是以尽可能高的分辨率保存你的设计文件。尽管如果有必要,你可以缩小图像,但事后添加像素是不可能的。”
一般来说,最好不要将照片放大超过原始尺寸的20%。调整文档中图像的大小也会改变文档中图像的输出分辨率。对于大尺寸的传单和小册子以及带有照片质量图像的广告来说尤其如此。但是,如果在画布上打印,100 DPI就足够了。

4.确保颜色准确性(CMYK与RGB)
—

当打印设计文件时,你在屏幕上看到的往往不是你从打印机上得到的。确保您在屏幕上看到的内容与打印机输出的内容相符的一种方法是检查设计的现有颜色模式。
电脑屏幕和数码相机看到的颜色和光线的光谱与打印机不同,如果两者不同步,打印出来的照片会很糟糕。产生可见光或通过传感器解释可见光的电子设备使用RGB光谱来产生颜色,因为混合这些颜色的光容易且平滑。
大多数(如果不是全部)设计软件程序默认使用RGB颜色模式。然而,打印机使用CMYK处理来叠加每个色调的不同强度,并创建全范围的颜色。与减色法RGB系统相反,这种加色过程涉及添加颜色以创建更深的黑色,而不是添加光线以远离黑色。
如果你想进一步了解两者的区别,看看这篇博文或者看下面的视频。但是基本要点是:如果你的电脑和打印机不使用相同的颜色语言,你的结果就不会正确。所以把你的程序设置成CMYK。
5.校准您的屏幕
—
另一种确保颜色准确性的方法是在打印前校准屏幕。当您打印模型草稿时,不准确的屏幕很容易影响颜色的真实色调。
平面设计师和摄影师有一系列工具可以在将设计发送给媒体之前检查图像的颜色准确性,在将规格发送给媒体之前确保图像是正确的,可以迅速为您节省大量印刷错误的费用。

重要的是要认识到,客户和设计师可能会对他们的显示器进行不同的校准,这可能会导致沟通问题。在几个不同的设备上查看一个设计通常有助于了解这是否是一个潜在的问题。或者,更好的是,把设计打印出来!虽然颜色不会与专业打印机打印出的颜色完美匹配,但这一小步可以帮助您注意到显示器上看不到的细微差异。
6.定义出血和裁剪标记
—
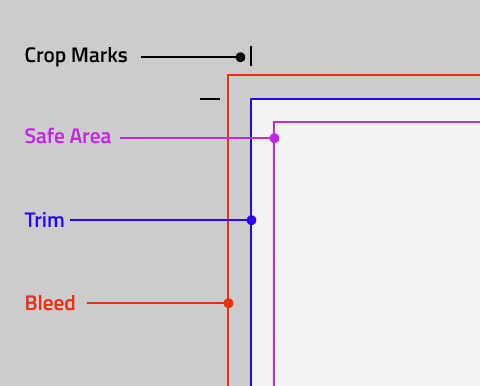
将您的设计从数字领域带到物理领域需要确保您的文件出血、裁剪和切割排列整齐。这些标记表示设计的边缘,以及打印后应该在哪里进行切割。这些会给你的设计带来专业的、设计新颖的感觉。
作物标记指示您的设计将被剪切的位置,以及流血是部分文本或对象超出页面边界以补偿裁切的地方。这鼻涕虫是出血区域之外的一个区域,包含打印机说明、打印的附加信息以及其他与工作相关的重要信息。忽略出血会让你有一面出现白边的风险,因为实体纸张超出了你的数字设计。不漂亮。
如果您的文本或图像支撑着裁剪边缘或折痕,那么考虑所选纸张的裁剪公差也是非常重要的。当你的传单被裁剪或装订后,布局上的细微差别会对对称性产生很大的影响。
更多关于排队和发信号给你的作物,出血,详细看这:
指定打印机的标记
准备打印文档时,需要许多标记来帮助打印机确定纸张的裁切位置,在制作校样时对齐分色胶片,测量胶片的校准和网点密度是否正确,等等。选择任何页面标记选项都会扩展页面边界以容纳打印机标记,流血(超出页面边界的文本或对象部分,以弥补裁切时的微小误差),或废料区(页面和出血之外的区域,包含打印机说明或作业签署信息)。
如果要设置裁剪标记,并希望图稿包含出血或辅助信息区域,请确保将图稿延伸到裁剪标记之外,以容纳出血或辅助信息。还要确保您的介质大小足够大,能够容纳页面和任何打印机标记、出血或辅助信息区。如果文档不适合介质,您可以使用“打印”对话框的“设置”区域中的“页面位置”选项来控制剪切项目的位置。
如果选择“裁剪标记”选项,打印跨页时,折叠标记将打印为实线。

印刷商标
A.作物标记B.牌照C.页面信息D.颜色条E.出血标记F.废料区
选择文件>打印。
单击“打印”对话框左侧的“标记和出血”。
选择所有打印机标记或单个标记。
打印出血或辅助信息区域
在中指定出血和辅助信息区文档设置对话框。当文档被裁切到其最终页面大小时,出血和辅助信息区将被丢弃。出血区域或辅助信息区域之外的对象(以延伸最远的为准)不会被打印。
打印时,您可以在标记和出血区域的出血和辅助信息区中覆盖出血标记的默认位置。
以PostScript文件格式保存的文件允许有能力的后处理程序实现它们自己的可变出血。
选择文件>打印。
单击“打印”对话框左侧的“标记和出血”。
选择所有打印机标记或单个标记。
覆盖中的出血设置文档设置对话框中,取消选中“使用文档出血设置”,并为“上”、“下”、“左”、“右”(对于单面文档)或“上”、“下”、“内”、“外”(对于双面文档)输入0到6英寸(或等效值)。要在页面的所有边上均匀扩展偏移,请单击使所有设置相同图标 .
.
单击“包括辅助信息区”以使用中定义的辅助信息区打印对象文档设置对话框。
注意:
通过单击出血预览模式,可以在打印前预览出血和辅助信息区 或Slug预览模式图标
 在工具箱的底部。(这些可能被预览模式图标隐藏
 .)
.)
标记和出血选项
标记和出血区域包括以下选项:
所有印刷商的标记
选择所有打印机标记,包括裁剪标记、出血标记、套准标记、色带和页面信息。
作物标记
添加精细(细线)水平和垂直嵌线,用于定义页面的修剪位置。裁剪标记也有助于将一种分色与另一种分色对齐。通过与出血标记一起使用,可以选择重叠的标记。
出血标记
添加精细(细线)规则,用于定义图像在定义的页面尺寸之外的额外区域量。
注册标记
在页面区域外添加小“目标”,用于对齐彩色文档中的不同分色。
颜色条
添加代表CMYK油墨和灰色色调的小方块颜色(增量为10%)。您的服务提供商使用这些标记来调整印刷机上的油墨密度。
页面信息
在每张纸或胶片的左下角以6磅Helvetica打印文件名、页码、当前日期和时间以及分色名称。页面信息选项要求水平边缘为0.5英寸(13毫米)。
请注意,页面信息以GothicBBB-Medium-83pv-RKSJ-H(中哥特)字体打印。
类型
让您选择默认打印机标记或自定义标记(例如,对于日文页面)。您可以创建自定义打印机标记或使用其他公司创建的自定义标记。
重量
显示裁剪线和出血线的可能粗细。
抵消
指定InDesign将在距离页面边缘(不是出血)多远的地方绘制打印机标记。默认情况下,InDesign在距离页面边缘6磅处绘制打印机标记。为了避免在出血上绘制打印机标记,请确保输入大于出血值的偏移值。
7.注意拼版
—
不,不仅仅是那个讨厌的家伙在聚会上一直跟着你,并试图将自己融入到你的所有谈话中…在印刷中,拼版是将你设计的所有页面排列到纸上的过程,以便更快地印刷并减少额外的纸张浪费。

把装订好的材料送到出版社过去需要更多的组织工作。从对齐页面到确保它们在打印时均匀地背靠背排列,打印小册子和多页小册子是一项任务。由于有了Adobe Publisher和类似的面向版式的程序,设置要在小册子或手册中发布的多页设计变得容易多了。
提示:记得在你的设计中间增加一点额外的空间来补偿装订。
8.创建高分辨率PDF
—
一旦你完成了每一步,是时候保存你的证据了。PDF文件大多是无损的可打印文件格式,非常适合这种用途。一旦你把所有东西都保存在PDF中,你就可以开始了!
9.选择完美的纸张
—

合适的报纸会带来很大的不同。将设计送到印刷店之前的最后一步:选择纸张。
不同类型的纸张产生不同的感觉和视觉吸引力。例如,你通常可以用较便宜的半光纸而不是较厚的哑光纸获得同样的专业效果。在开始印刷之前,花一点时间考虑你想要创造的效果类型。
印前的危险信号
检查印前并寻找危险信号有助于您从概念到最终印刷保持设计的完整性,因此在翻译过程中不会丢失任何东西。印前帮助您捕捉小错误,这些小错误在到达印刷店时会变成大错误,这些错误会立即使数小时的思考和设计变得毫无意义。只需几个快速步骤,您就可以节省资金,同时确保您的工作每次都符合您的高标准。
更改媒体上的页面位置
当您将文件列印成大於文件尺寸的单页纸张尺寸时,您可以使用「列印」对话方块的「设定」区域中的「页面位置」选项,来控制嵌条和出血区域、印表机标记和页面落在媒体上的位置。如果文档不适合介质,需要被剪切,您可以指定要剪切文档的哪一部分。“打印”对话框中的预览图像显示了结果。
注意:
要查看出血和辅助信息区以及打印机标记,请使用“缩放以适应”选项,而不是页面位置。缩放页面始终居中。选择“缩放以适合”、“缩略图”或“平铺”时,页面位置选项不可用。